
One of the main use cases that has kept me on a *Nix platform is my time investment in learning the Bash terminal, sed/awk/grep/cut/wc/etc. This post is my first attempt to replicate common analysis workflows in Powershell. Please comment or reach out to me @securitymustard if you have better ways or anything to add.
For this post I'll create a CSV timeline from the evidence on my "Baud.. James Baud" exercise using Plaso. First I mounted the roger_image.ad1 image from the "Baud James Baud" forensics CTF using FTK imager. Make sure to select "File System / Read Only" when mounting to ensure any tools you want to run against the mounted image will work.

log2timeline.exe C:\Users\Username\Desktop\baud.plaso D:\
(D is the drive letter FTK assigned the mounted image).
A logical next step is to run "pinfo.exe" from the Plaso toolkit to show what events were processed.
pinfo.exe C:\Users\Username\Desktop\baud.plaso
Finally to complete a CSV timeline we run "psort.exe" to create a CSV from the Plaso database in Eastern Standard Time.
psort.exe -o l2tcsv -z EST -w C:\Users\Username\Desktop\baud.csv C:\Users\Username\Desktop\baud.plaso
The end result is a CSV file containing ~320,000 rows. On a Linux or OSX box in Bash we'd easily verify exactly how many using "wc -l baud.csv". How do we do this in Powershell?
gc .\baud.csv | measure-object -Line

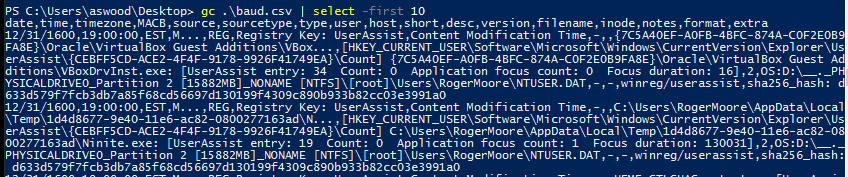
In Bash we'd likely size up the data by viewing the first 10 rows with the head command. "head -n10 .\baud.csv". The equivalent command in Powershell would be:
gc .\baud.csv | select -first 10
Looking at the first line, we see that the 5th column is the "Source". In Bash we'd likely run "cut -d',' -f5 baud.csv | sort | uniq -c | sort -n" to see the distribution of the timeline.
gc .\baud.csv | %{$_.split(',')[4]} | group-object -noelement
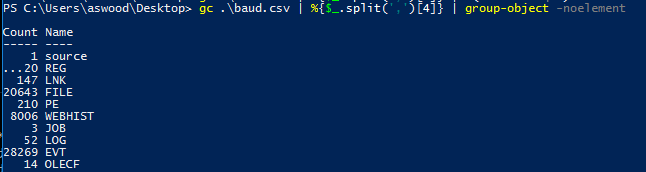
Our Powershell equivalent above shows the number of records for each source type. The next logical move is to start using grep to filter this list based upon what questions we're trying to answer. Unfortunately we don't have grep - but we do have "Select-String" which in this case will do just fine.
As far as questions we're trying to answer - lets focus in on the malware that was run in the "Baud, James Baud" scenario (file information, execution, surrounding events). There was a file named "conneryhaters.hta" so "conneryhaters" is a good first search.
Select-String -pattern "conneryhaters" .\baud.csv


This quickly shows us the time that the user downloaded the file from "http://128.199.170.85/conneryhaters.hta" and the file was written to "Users\RogerMoore\AppData\Local\Microsoft\Windows\INetCache\Low\IE\DT34KEU7\conneryhaters[1].hta". Looks like the user chose to "Run" rather than simply save.
Excellent Resources on moving from Bash to Powershell:
- http://cecs.wright.edu/~pmateti/Courses/233/Labs/Scripting/bashVsPowerShellTable.html
- http://five.agency/powershell-tips-for-bash-users/
- http://windowsitpro.com/powershell/powershell-basics-sorting-measuring-objects
No comments:
Post a Comment